Showing posts with label xp. Show all posts
Showing posts with label xp. Show all posts
Sunday, February 19, 2017
Change Customize Your Desktop Icons in Windows 10 8 7 Xp
Change Customize Your Desktop Icons in Windows 10 8 7 Xp
An icon will allow you to recognize and differentiate the various programs and folders on your computer. However, you may find that some icons may not be visible enough on your desktop, and can be easily lost among your folders. Windows gives its users the ability to change and customize any image, folder, or software icon to help you distinguish your files.
This article will take you through the process of customizing your desktop folders step-by-step.
Customize Windows Desktop Folders

Change Icon of Hard Drive or USB
Changing the bureau icons of a hard drive or USB key is not as simple as tweaking a few properties. In order to replace your current icon, you will need to add a specific file to the root of your hard drive (or USB key) to replace the icon currently in use.
The first step is to do a search for the image youd like to use as a desktop icon. There are a variety of sites that offer free icons, such as , or , but you can also choose any image youd like, as long as the file is in .ico format.
Next, register the image to the root of your drive or USB key. In this example, we saved an image of a Lego piece to the root of a USB key, under the name "key.ico":
![Customize Windows icon]()
Next, open Windows Notepad and enter the following code. Note that the name you used to register your icon should replace "key.ico."
[Autorun]
ICON = key. i co

Now go to File > Save As. Go to the root of your drive or your key, select the drop down menu Type: All Files and name your file autorun.inf:

Refresh your window using the F5 key, and the icon for your drive or your key will be changed.
How To Modify a Shortcut Icon
Windows also allows you to change and customize your Shortcut folder icons. This process is much easier than changing a hard drive icon and can be done in your Windows Properties.
Right-click on the icon in question and choose Properties. Then click on the option that reads Change Icon and choose from the icons offered by Windows. If none of the options suit you, you can download and/or import other options by simply clicking Browse.
Click OK to validate your choice, and then click OK to close the Properties window. The shortcut icon will then be changed.
Create Custom Icons with IcoFx
If you prefer to create your own icons using a photo, or your own drawings, you can do so with icon editor IcoFx. Download your free 30-day trial .
.
Convert Photo into Icon
To create a photo icon, simply open the software, and use File > Open to find and select your photo. Once your photo has been selected, select the Create Image icon from the list of options.
The software will generate a list of sizing options. We recommend choosing 256 x 256 for an icon with a larger margin.
Finally, click on File > Save As and name your icon. You can set your photo icon by using the process explained above.
Draw Personalized Desktop Icon
IcoFx also provides users with the tools necessary to draw their own icons. Go to File > New > New Icon. Then select your preferred icon size (we recommend 64 x 64 px). Confirm by clicking OK.
See Also: Change Default Image Editing Program on Windows
Use the tools in the application to paint your custom icon. All tools are located in the left- hand column (brush, paint bucket, eraser, etc.). Once you finish your design, click on File > Save As and name your icon. Then set it to your desktop using the process explained above.
This article will take you through the process of customizing your desktop folders step-by-step.
Customize Windows Desktop Folders

Change Icon of Hard Drive or USB
Changing the bureau icons of a hard drive or USB key is not as simple as tweaking a few properties. In order to replace your current icon, you will need to add a specific file to the root of your hard drive (or USB key) to replace the icon currently in use.
The first step is to do a search for the image youd like to use as a desktop icon. There are a variety of sites that offer free icons, such as , or , but you can also choose any image youd like, as long as the file is in .ico format.
Next, register the image to the root of your drive or USB key. In this example, we saved an image of a Lego piece to the root of a USB key, under the name "key.ico":
Next, open Windows Notepad and enter the following code. Note that the name you used to register your icon should replace "key.ico."
[Autorun]
ICON = key. i co

Now go to File > Save As. Go to the root of your drive or your key, select the drop down menu Type: All Files and name your file autorun.inf:

Refresh your window using the F5 key, and the icon for your drive or your key will be changed.
How To Modify a Shortcut Icon
Windows also allows you to change and customize your Shortcut folder icons. This process is much easier than changing a hard drive icon and can be done in your Windows Properties.
Right-click on the icon in question and choose Properties. Then click on the option that reads Change Icon and choose from the icons offered by Windows. If none of the options suit you, you can download and/or import other options by simply clicking Browse.
Click OK to validate your choice, and then click OK to close the Properties window. The shortcut icon will then be changed.
Create Custom Icons with IcoFx
If you prefer to create your own icons using a photo, or your own drawings, you can do so with icon editor IcoFx. Download your free 30-day trial
 .
. Convert Photo into Icon
To create a photo icon, simply open the software, and use File > Open to find and select your photo. Once your photo has been selected, select the Create Image icon from the list of options.
The software will generate a list of sizing options. We recommend choosing 256 x 256 for an icon with a larger margin.
Finally, click on File > Save As and name your icon. You can set your photo icon by using the process explained above.
Draw Personalized Desktop Icon
IcoFx also provides users with the tools necessary to draw their own icons. Go to File > New > New Icon. Then select your preferred icon size (we recommend 64 x 64 px). Confirm by clicking OK.
See Also: Change Default Image Editing Program on Windows
Use the tools in the application to paint your custom icon. All tools are located in the left- hand column (brush, paint bucket, eraser, etc.). Once you finish your design, click on File > Save As and name your icon. Then set it to your desktop using the process explained above.
Available link for download
Cara Setting Konfigurasi LAN SPEEDY Windows xp
Cara Setting Konfigurasi LAN SPEEDY Windows xp
CARA SETTING IP LAN SPEEDY Server Dan client
 |
Langsung ja Ea Saya share tutorialnya Untuk mengubungkan antara dua komputer dalam jaringan, maka salah satu komputer yang dijadikan Server (yang terkoneksi dengan modem) harus memiliki dua network-card. Satu untuk menghubungkan dengan modem SPEEDY (server). Satu untuk mengubungkan dengan komputer yang satunya, (client) Kedua kartu jaringan ini harus sudah di-install driver-nya.
Setting Jaringan Pada Server
a. Pada Kartu Jaringan Pertama (yang terhubung ke modem)- Masuk ke tempat pengaturan jaringan di Windows (Start ? Control Panel ? Network and Internet Connection ? Network Connection)
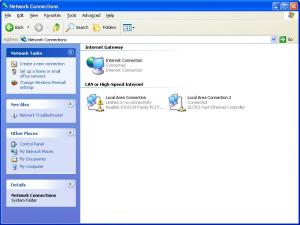
Halaman Network Connection
- Klik kanan pada kartu jaringan pertama, pilih “properties”.
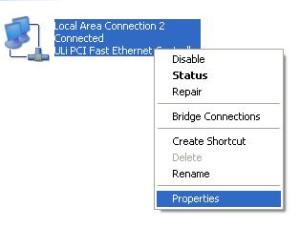
- Pilih tab “advance”. Lalu pada Internet Connection Sharing, check “allow other user to connect through this computer”. Dan uncheck pada “allow other user to control or disable this shared connection”.
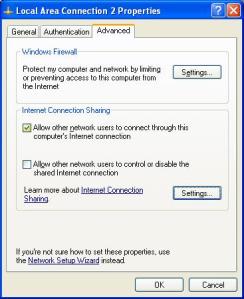
- Kalau ingin, anda dapat mengatur layanan yang bisa diakses oleh komputer client, klik pada tombol Setting.
- Masih pada tab “advance”. Pada Windows Firewall, klik tombol Settings. Lalu matikan windows firewall (turn off). Dan sekarang status jaringan pada server = connected.

- Klik kanan pada kartu jaringan kedua, pilih “properties”.
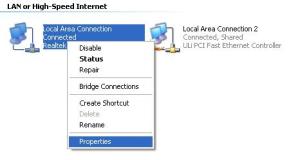
- Pilih “Internet Protocol TCP/IP”. Lalu klik tombol Properties.
- Setting sebagai berikut :
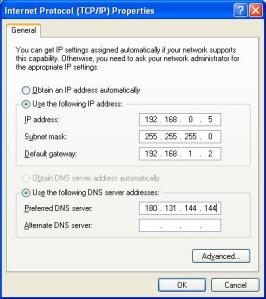
Menggunakan DNS Nawala
- Cek konfigurasi jaringan yang baru saja dibuat dengan masuk ke command-prompt dan mengeksekusi perintah “ipconfig”. Tampilan sebagai berikut : (gambar 10)
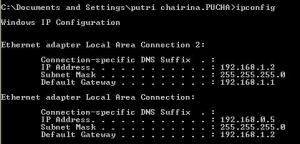
Setting Pada Komputer Client
- Masuk ke Network Connection pada komputer Client. Atur konfigurasi menjadi sebagai berikut :
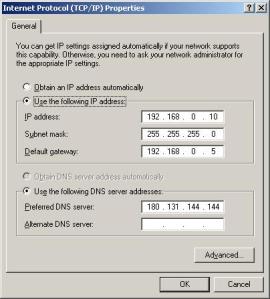
Menggunakan DNS Nawala
- Kemudian, tampilan Network Connection akan berubah menjadi sebagai berikut :
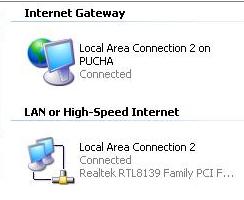
Selamat Mencoba Dan Semoga Bermanfaat
Available link for download
Monday, January 30, 2017
Chat sederhana lewat net send pada windows xp
Chat sederhana lewat net send pada windows xp
Pernakah dan seberapa sering anda chating?? Jika sering mungkin anda pasti mengenal dengan program seperti yahoo messenger, mirc, facebook chat dan lain lain. Tapi tahukah anda windows pun mempunyai program chat sederhana khusus jaringan LAN, namanaya adalah net send. Dengan net send anda tidak perlu mendownload program tambahan dan menginstalnya, anda hanya perlu mengaktifkan service tertentu saja secara manual pada setiap komputer yang terhubung dengan jaringan.
Berikut caranya:
1. Buka contol panel > Administrative Tools > services
2. Lalu pada windows service’s pilih service dengan nama messenger tampa tanda kutip.

3. Buka services messenger tersebut, dengan memekan double click pada mouse maka akan tampil windows berikut.

4. Pilih start up typenya menjadi manual (1). Lalu tekan tombol start untuk mengaktifkan servicenya(2). Lalu ok(3).
Kini fitur net send telah aktif.
5. Lalukan cara dari nomer 1 ~ 4 pada komputer yang lain yang telah tehubung dengan jaringan.
Jika sudah mengakitfkan services-nya anda bisa langsung mengetesnya. Caranya:
6. Buka command prompt, all program > Accessories > command prompt. (Atau bisa dengan menekan tombol windows + R, lalu ketikan cmd tampa tanda kutip)
7. Lalu ketikan perintah berikut net send [ip / nama komputer tujuan] [pesan yang di sampaikan], contoh: 192.168.1.9 net send percobaan net send tampa tanda kutip.

Maka pesan tersebut akan tampil di komputer tujuan, seperti gambar di bawah ini.

Chat lewat net send memang sedikit lebih sulit dan ribet.
Karena pertama kita harus mengetikan perintah secara berulang ulang.
Kedua kita harus mengetahui Ip setiap komputer tujuan, karena tidak ada daftar yang tersedia.
Ketiga bagi yang tidak terbiasa / belum pernah menggunakan CUI(character user interface) mungkin akan merasa bosan dengan tapilan program, karena berlatar CUI bukan GUI(Graphical User Interface).
Bagi yang penasaran dan ingin mencari sesuatu yang unik tidak ada salahnya mencoba.
Selamat mencoba dan semoga bermanfaat :D
Available link for download
Monday, November 7, 2016
Cara Sharing Printer Pada Windows XP 2013
Cara Sharing Printer Pada Windows XP 2013
Apabila anda mempunyai satu buah Printer dan akan dioperasikan untuk beberapa komputer yang sudah tersambung dengan jaringan komputer (LAN), hal ini tentunya baik sekali karena akan mengirit biaya pembelian printer. Pada pembahasan sekarang ini saya akan berikan tips mengenai Cara Sharing Printer Pada Windows XP dilengkapi dengan gambar. Simak cara melakukan sharing printer dengan beberapa komputer dibawah ini.
Cara Sharing Printer Pada Windows XP
1. Pastikan driver printer sudah terinstal pada komputer utama
2. Lalu buka Control Panel dan pilih Printer and Faxes (pada komputer utama)
3. Akan muncul gambar printer, lalu klik kanan dan pilih Sharing

4. Klik pada Share this printer, lalu Apply

Sharing printer pada komputer lain di Windows XP
Setelah setting printer pada komputer utama, berikutnya setting printer pada komputer lain agar terkoneksi dengan komputer utama, caranya :
1. Pindah ke komputer lain yang akan dihubungkan dengan printer pada komputer utama.
2. Klik tombol Start lalu pilih Printer and Faxes
3. Klik Add a printer

4. Akan tampil gambar Add printer Wizard, lalu klik Next

5. Berikutnya pilih A network printer, or a printer attached to another computer, lalu klik Next

6. Selanjutnya pilih browse for a printer dan klik Next

7. Maka akan ditampilkan nama printer pada komputer utama, pilih jenis printernya dan klik Next. Kalau sudah lalu klik tombol Finish
Selesai, semoga pembahasan mengenai cara sharing printer pada Windows XP dapat bermanfaat, silahkan dicoba dan semoga berhasil.
sumber : http://bloggerbondowoso24.blogspot.com/2013/05/cara-sharing-printer-pada-windows-xp.html
sumber : http://bloggerbondowoso24.blogspot.com/2013/05/cara-sharing-printer-pada-windows-xp.html
Available link for download
Subscribe to:
Posts (Atom)